

April 10, 2025
Today, we’re talking about the basics of Showit SEO for beginners: how to set it up, where to put the right words, and how to help search engines (and your future clients) understand what your site is all about. If you’re using Showit to build your website and you want people to actually find it online, this post is for you.
Because even if your website looks beautiful, it won’t show up in search results unless it’s been optimized. That’s what SEO is – and we’re going to make it as simple and non-techy as possible.
Step by step. In plain language. With real-world examples, and nothing you don’t need.
(P.S. If you’re still working on your website structure and content, you might want to check out this guide on creating a beautiful, high-converting website first.)
Here’s what we’ll cover:
- What is SEO?
- Why SEO matters for your website
- Step 1: Choose your target keyword
- Step 2: Use your keyword in the right places
- Step 3: Use clear and structured headings
- Step 4: Set your page titles and meta descriptions
- Step 5: Rename your images and add alt text
- Step 6: Make sure your site works well on phones and loads quickly
- Step 7: Submit your sitemap to Google
- Step 8: Create helpful blog content over time
What is SEO?
SEO stands for Search Engine Optimization.
At its core, it’s the process of helping search engines (like Google) understand what your website is about – so they can show it to people who are searching for services like yours.
I know, the term itself sounds so vague and techy. But think of it like this:
Imagine your website is a beautiful little wellness studio tucked into a busy city block. If you don’t put up any signs outside – no name, no services, no open hours – how will anyone walking by know what’s inside?
SEO is you putting up those signs.
You’re the one saying, “Hi! I offer acupuncture in Portland.”
Or: “I’m a brand strategist for holistic businesses.”
Or: “I help new moms with postpartum nutrition.”
You do this by adding specific words and descriptions in certain places on your website – places that search engines look at, like your page titles, headings, image descriptions, and more.
Search engines use that information to match your site with what someone types into the search bar. So if someone searches for “Reiki sessions online” – and your website clearly says you offer Reiki sessions online – that’s a match.
You’re not tricking search engines or hacking the system. You’re just making it easy for them to understand what you do. And that clarity is what helps your site show up in search results when it matters most.
Why SEO matters for your website
If your site isn’t set up for SEO, it may look great, but it probably won’t show up when someone searches online for services you offer.
SEO ensures your website can:
- Appear in relevant search results
- Reach more of the right people
- Attract new clients without relying on ads or social media
And if you’re using Showit to build your site, you’re in luck. It’s such a great platform for wellness professionals and it offers really great SEO capabilities if you know how to set it up. In this guide, I’ll walk you through exactly how to optimize your Showit site for SEO success. Let’s get into it ↓
Step 1: Choose your target keyword
To start, pick one main word or phrase that describes what each page or blog post is about. These words are called keywords. They’re the actual questions or phrases people type into search engines when looking for help.
Ask yourself: What would someone search for to find this page? (Do this for every single page!)
Examples of target keywords:
- “Marketing expert for coaches”
- “Online business coaching”
- “Reiki sessions in Montreal”
To find good keywords, think about what you offer and what your clients commonly ask. You can use free tools like Ubersuggest or AnswerThePublic see what people are actually searching for. Just enter your keyword idea or the topic related to your page, and they’ll show you popular search terms. (Note: the free versions give you 3 searches a day, so choose your searches wisely!)
Step 2: Use your keyword in the right places
Once you’ve picked your keyword, pop it into all of these important spots on your page:
- The page title
- At least one subheading (like a section title)
- The first paragraph
- The filenames and alt text of your images (more on this below)
- The meta description (more on this below)
It’s important to use the keyword early on in your content, but don’t overuse it. Let it flow naturally without forcing it into every sentence.
Step 3: Use clear and structured headings
Every page on your site should be easy to read and follow. One way to do this is by using headings, which are titles that organize your content into sections. This helps both your readers and search engines understand your page.
How to use headings properly
- H1: This is the main title of your page and should only be used once per page (this is very important!)
Example: “Wellness Coaching for Busy Professionals” - H2: These are section titles that live within your H1. They divide your content into major topics and help show both your readers and search engines what the key points of the page are. Think of them like the chapter titles in a book.
Example: “What We Offer”, “How Our Coaching Works”, “Client Success Stories” - H3: These are subsection titles that go under your H2 sections. Use them to break down larger sections into smaller, more specific topics.
Example: In your “What We Offer” section, you might include subsections like “One-on-One Coaching Sessions” and “Group Coaching Classes”. These would each be H3 headings under the H2 section.
How to set up your headings in Showit:
- Click on the text box where you want to apply a heading.
- In the right-hand panel, you’ll find a dropdown menu under Text Properties called “Text Tag”. This is where you select your heading style.
- Choose the appropriate heading for your content: H1, H2, or H3.

You’ll also see other text options in the dropdown menu:
- div: In Showit, this tag is mainly used for decorative text elements. Use it sparingly for text that isn’t important for search engines.
- p: This is for regular paragraphs and body text. Use this for any text that isn’t a heading (H1, H2, or H3).
- nav: This tag is for your menu links, like those in your navigation bar. It helps search engines and screen readers know where the menu is. Don’t use this for buttons or other links on your pages—use the p tag for those.
Why it’s important: Using the right headings and text tags helps your readers navigate your page and makes it easier for search engines to understand you content better. This improves your chances of ranking higher in search results and provides a smoother browsing experience for your visitors.
Step 4: Set your page titles and meta descriptions
Each page in Showit allows you to set a Page Title (this is the blue clickable link that appears in search results) and a Meta Description (the text below that link that describes your page).

Your Page Title should be under 60 characters and your Meta Description should be under 155 characters. Anything longer might get cut off in search results, and sometimes Google will replace them with its own version if they don’t fit.
Make sure both include your focus keyword and clearly describe what the page is about. For example, if your focus keyword is “herbal hormone support“, here’s how you could use it:
Page Title: Herbal Hormone Support for Women | Wildflower Wellness
Meta Description: Personalized herbal support for women navigating hormonal shifts — in-person and virtual sessions available.
Now, the age-old question I always get…
Do I have to use my keyword exactly word-for-word?
The answer is no, it doesn’t have to be exact. Paraphrasing or using close variations is totally fine, and in many cases, it actually reads better.
Search engines like Google are smart enough to understand related phrases, synonyms and natural variations. As long as your meaning is clear, and the wording is close enough to what someone might actually search for, you’re still helping your SEO.
How to set up your Page Title and Meta Descriptions in Showit:
- Click on the page name in the left panel (*not a text box, image, or anything on the canvas, but the actual page itself*).
- In the right-hand panel, scroll down to the SEO Settings and you’ll find the fields to enter your Page Title and Meta Description. (Don’t forget to upload a Share Image, too! It’s what shows up when your page is shared on social media!)

Step 5: Rename your images and add alt text
We all know how images play a big role in your site’s design. But here’s something most people don’t realize: search engines can’t actually see your images.
They rely on 2 things to understand what each image is about:
- The filename → what the image is called when you upload it
- The alt text (short for “alternative text”) → this is a brief description that tells search engines (and people using screen readers) what the image is about. It’s also what shows up if an image can’t load (which happens more often than you think!) So, it plays a big role in both your SEO and your site’s accessibility.
If these fields are blank or filled with default text like “IMG_9284.jpg”, Google has noooo idea what that image is about.
So let’s fix that!
How to make sure your images support your SEO
- Rename your image files before uploading them to your site. Instead of leaving it as something like “untitled.jpg” or “IMG_1234.jpg”, change the filename to something descriptive and relevant like, “herbal-consultation-client-wellness.jpg”. Try to include your keyword in the filename if it makes sense.
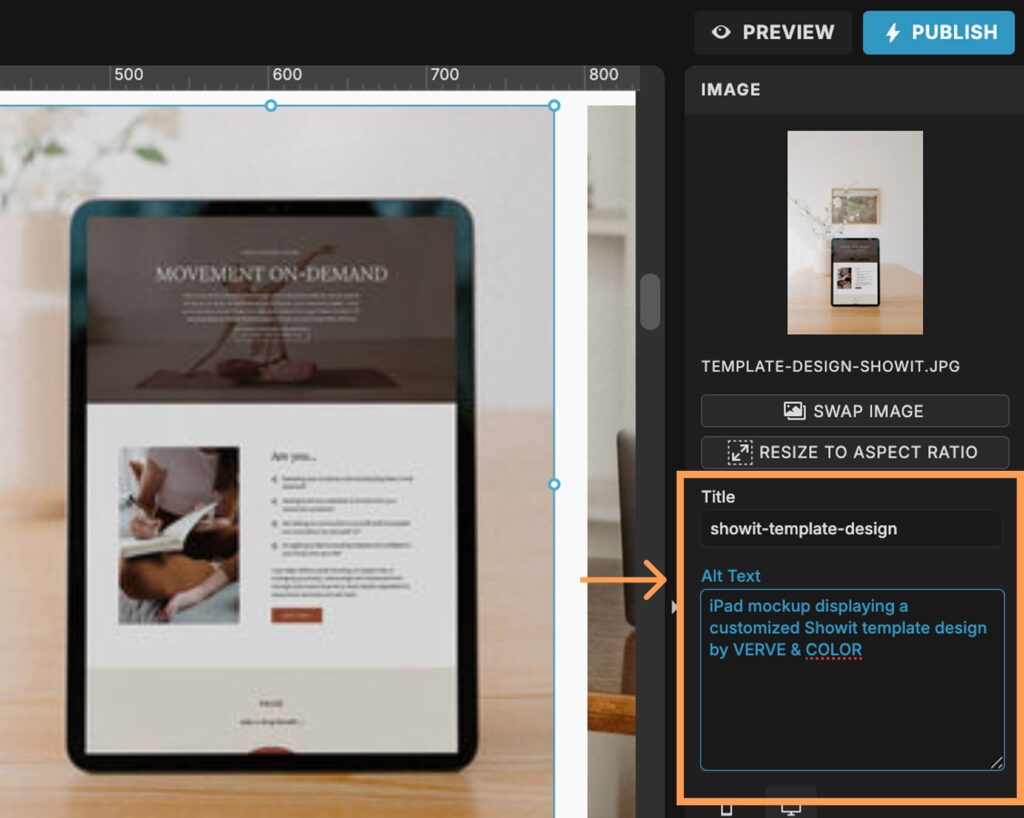
- Add descriptive alt text in Showit. After uploading your image in Showit, click on it, and in the right-hand panel, you’ll see a field for Alt Text. Write a short, clear description of what’s in the image and how it relates to your content.
For example, if your image shows someone journaling during a morning routine, and your focus keyword is “morning wellness rituals”, you could naturally include it in your alt text like this: “Woman journaling as part of her morning wellness routine”.
Keep it short, accurate, and natural. You’re not trying to stuff keywords – just helping Google (and those with screen readers) understand what the image shows.
Step 6: Make sure your site works well on phones and loads quickly
This is another one of those behind-the-scenes steps that will make a huge difference, not just for your SEO, but for your visitors’ experience too.
Search engines like Google pay close attention to how well your site works on mobile and how fast it loads. If your site is slow or clunky on a phone, it can affect your rankings, and will most definitely cause people to leave before they read a single word.
And one of the reasons I love Showit so much is that it’s so easy to make your site mobile-responsive! There’s a tool in the site builder that helps you autogenerate a mobile layout, BUT it’s not always perfect.
How to make sure your site is responsive and loads quickly
- Review every page on mobile view. Do this in Showit and on your phone (you can use the preview link that Showit gives you to test your pages on your phone). Take the time to click through each page and make sure text isn’t overlapping, fonts are easy to read, and buttons are big enough to tap (at least 44px tall is a good rule of thumb).
- Use the right image file types. JPG is usually best for photos, while PNG works better for images with transparency or sharp edges (like logos or icons). Avoid uploading massive PNGs unless they’re necessary.
- Compress your images before uploading. Large image files are one of the biggest reasons websites load slowly. Use a tool like TinyPNG or iLoveIMG to compress your images before uploading (and remember to rename them!) It only takes a few seconds and can dramatically speed things up.
Bonus tip: You can test your site speed using Google PageSpeed Insights. Just enter your URL and it’ll show you how fast your site loads. Plus, it gives you tips if anything needs fixing!
Step 7: Submit your sitemap to Google
Once you’ve set up your keywords, titles, image descriptions, and mobile layout, you want to make sure Google knows your site exists.
That’s where your sitemap comes in.
A sitemap is basically a list of all the pages on your site – and it helps Google find and index everything more easily.
How to submit your Showit site to Google:
- In your browser, go to yourdomain.com/siteinfo.xml (Just replace “yourdomain.com” with your actual website address.)
- Copy that URL – this is your sitemap.
- Then, head over to Google Search Console and log in with your Google account. If you haven’t already, you need to add and verify your domain (they’ll walk you through it).
- Once your site is verified, find the Sitemaps section in the left sidebar. Paste in the URL you copied earlier and hit Submit.
That’s it!
Now Google knows where to find your pages and can crawl your site more efficiently – which helps get your content showing up in search results faster.
Step 8: Create helpful blog content over time
At this point, your main site pages are optimized which is amazing! BUT – blogging takes your SEO to the next level.
Why?
Because each blog post is another opportunity for your site to show up in search results. You’re not just optimizing for your homepage or services – you want to be creating content around the exact questions and topics your ideal clients are already Googling.
Here’s why blogging helps with SEO:
- It gives you more chances to rank and more ways to get found by clients through Google. Each post is a new URL that Google can index = more doors into your website.
- It builds trust and authority. When people land on a helpful blog post, they’re more likely to explore your services (and trust that you know what you’re talking about).
- It keeps your site active. Regular updates show Google your site is alive and valuable – which it loves.
So what should you blog about?
Start with questions your clients ask all the time.
Example topics:
“What to expect in your first energy healing session”
“Natural ways to support your cycle with herbs”
“Daily rituals to reduce stress and support nervous system health”
Each of these could target a specific keyword, like:
energy healing session
hormone balance herbs
stress relief rituals
You can use the same keyword tools from Step 1 (like Ubersuggest or AnswerThePublic) to help you brainstorm what people are searching for.
Here’s a little Blog SEO checklist for you:
- Choose one focus keyword per post
- Use that keyword in your title, first paragraph, and at least one heading
- Add it to the image alt text and the meta description
- Write at least 300-500 words (Google likes content that actually says something)
- Keep it helpful, not salesy
And if you’re feeling overwhelmed or stuck, even one blog post a month can make a difference over time. The key is consistency and genuinely answering the questions your people are asking.
So, are you ready to be found (finally)?
See, you don’t have to be a tech expert to make your Showit site more discoverable.
By taking a few intentional steps – like choosing the right keywords, adding image descriptions, and writing helpful content – you’re already doing more than most. SEO doesn’t have to be complicated. It’s about making your website clearer, easier to find, and more helpful for the people who need what you offer.
Just start simple. Optimize one page. Write one blog post. And go from there.
And if you’re ever unsure or just want someone to walk through it with you – that’s what I’m here for 🙂
You’ve got this.

Vickie is the founder of VERVE & COLOR, a creative studio crafting elevated, intentional websites for health and wellness brands. She’s spent over a decade studying and practicing wellness—from holistic nutrition and meditation to sound therapy and somatic healing—alongside a career designing digital experiences for global companies. Today, she blends both worlds to create websites that are not only beautiful and easy to use, but rooted in the heart of the work her clients do.
