
October 10, 2025
You’ve built a beautiful website on Showit, and now you’re ready to take the next step – selling your own digital products, downloads, or courses.
Whether it’s a wellness guide, an online program, or a small product line, adding a shop to your Showit site is completely doable (and you don’t have to be “techy” to make it happen).
This guide breaks down exactly how to add an online shop to your Showit website in just a few simple steps.
First things first: Can you sell products on Showit?
The short answer is yes – but with a little help.
Showit itself doesn’t handle payments or shopping carts. Instead, it lets you design your shop pages however you like, and then connect them to a checkout tool like Shopify, ThriveCart or Flodesk Checkout that securely processes payments.
Think of Showit as your storefront – you can make it beautiful, inviting, and fully on-brand – and then the cart system works behind the scenes to process payments and send confirmations.
Who this setup works best for
Showit is perfect if you:
- Offer services but want to add a few digital products or resources to your site
- Sell courses, guides, or downloads
- Run a small wellness shop with under 20 items
- Want your shop to blend seamlessly with your existing site
If you’re planning to run a large store with lots of inventory, a full Shopify site is a better fit. But there are many brands that also do a hybrid setup, which I’ll explain below.
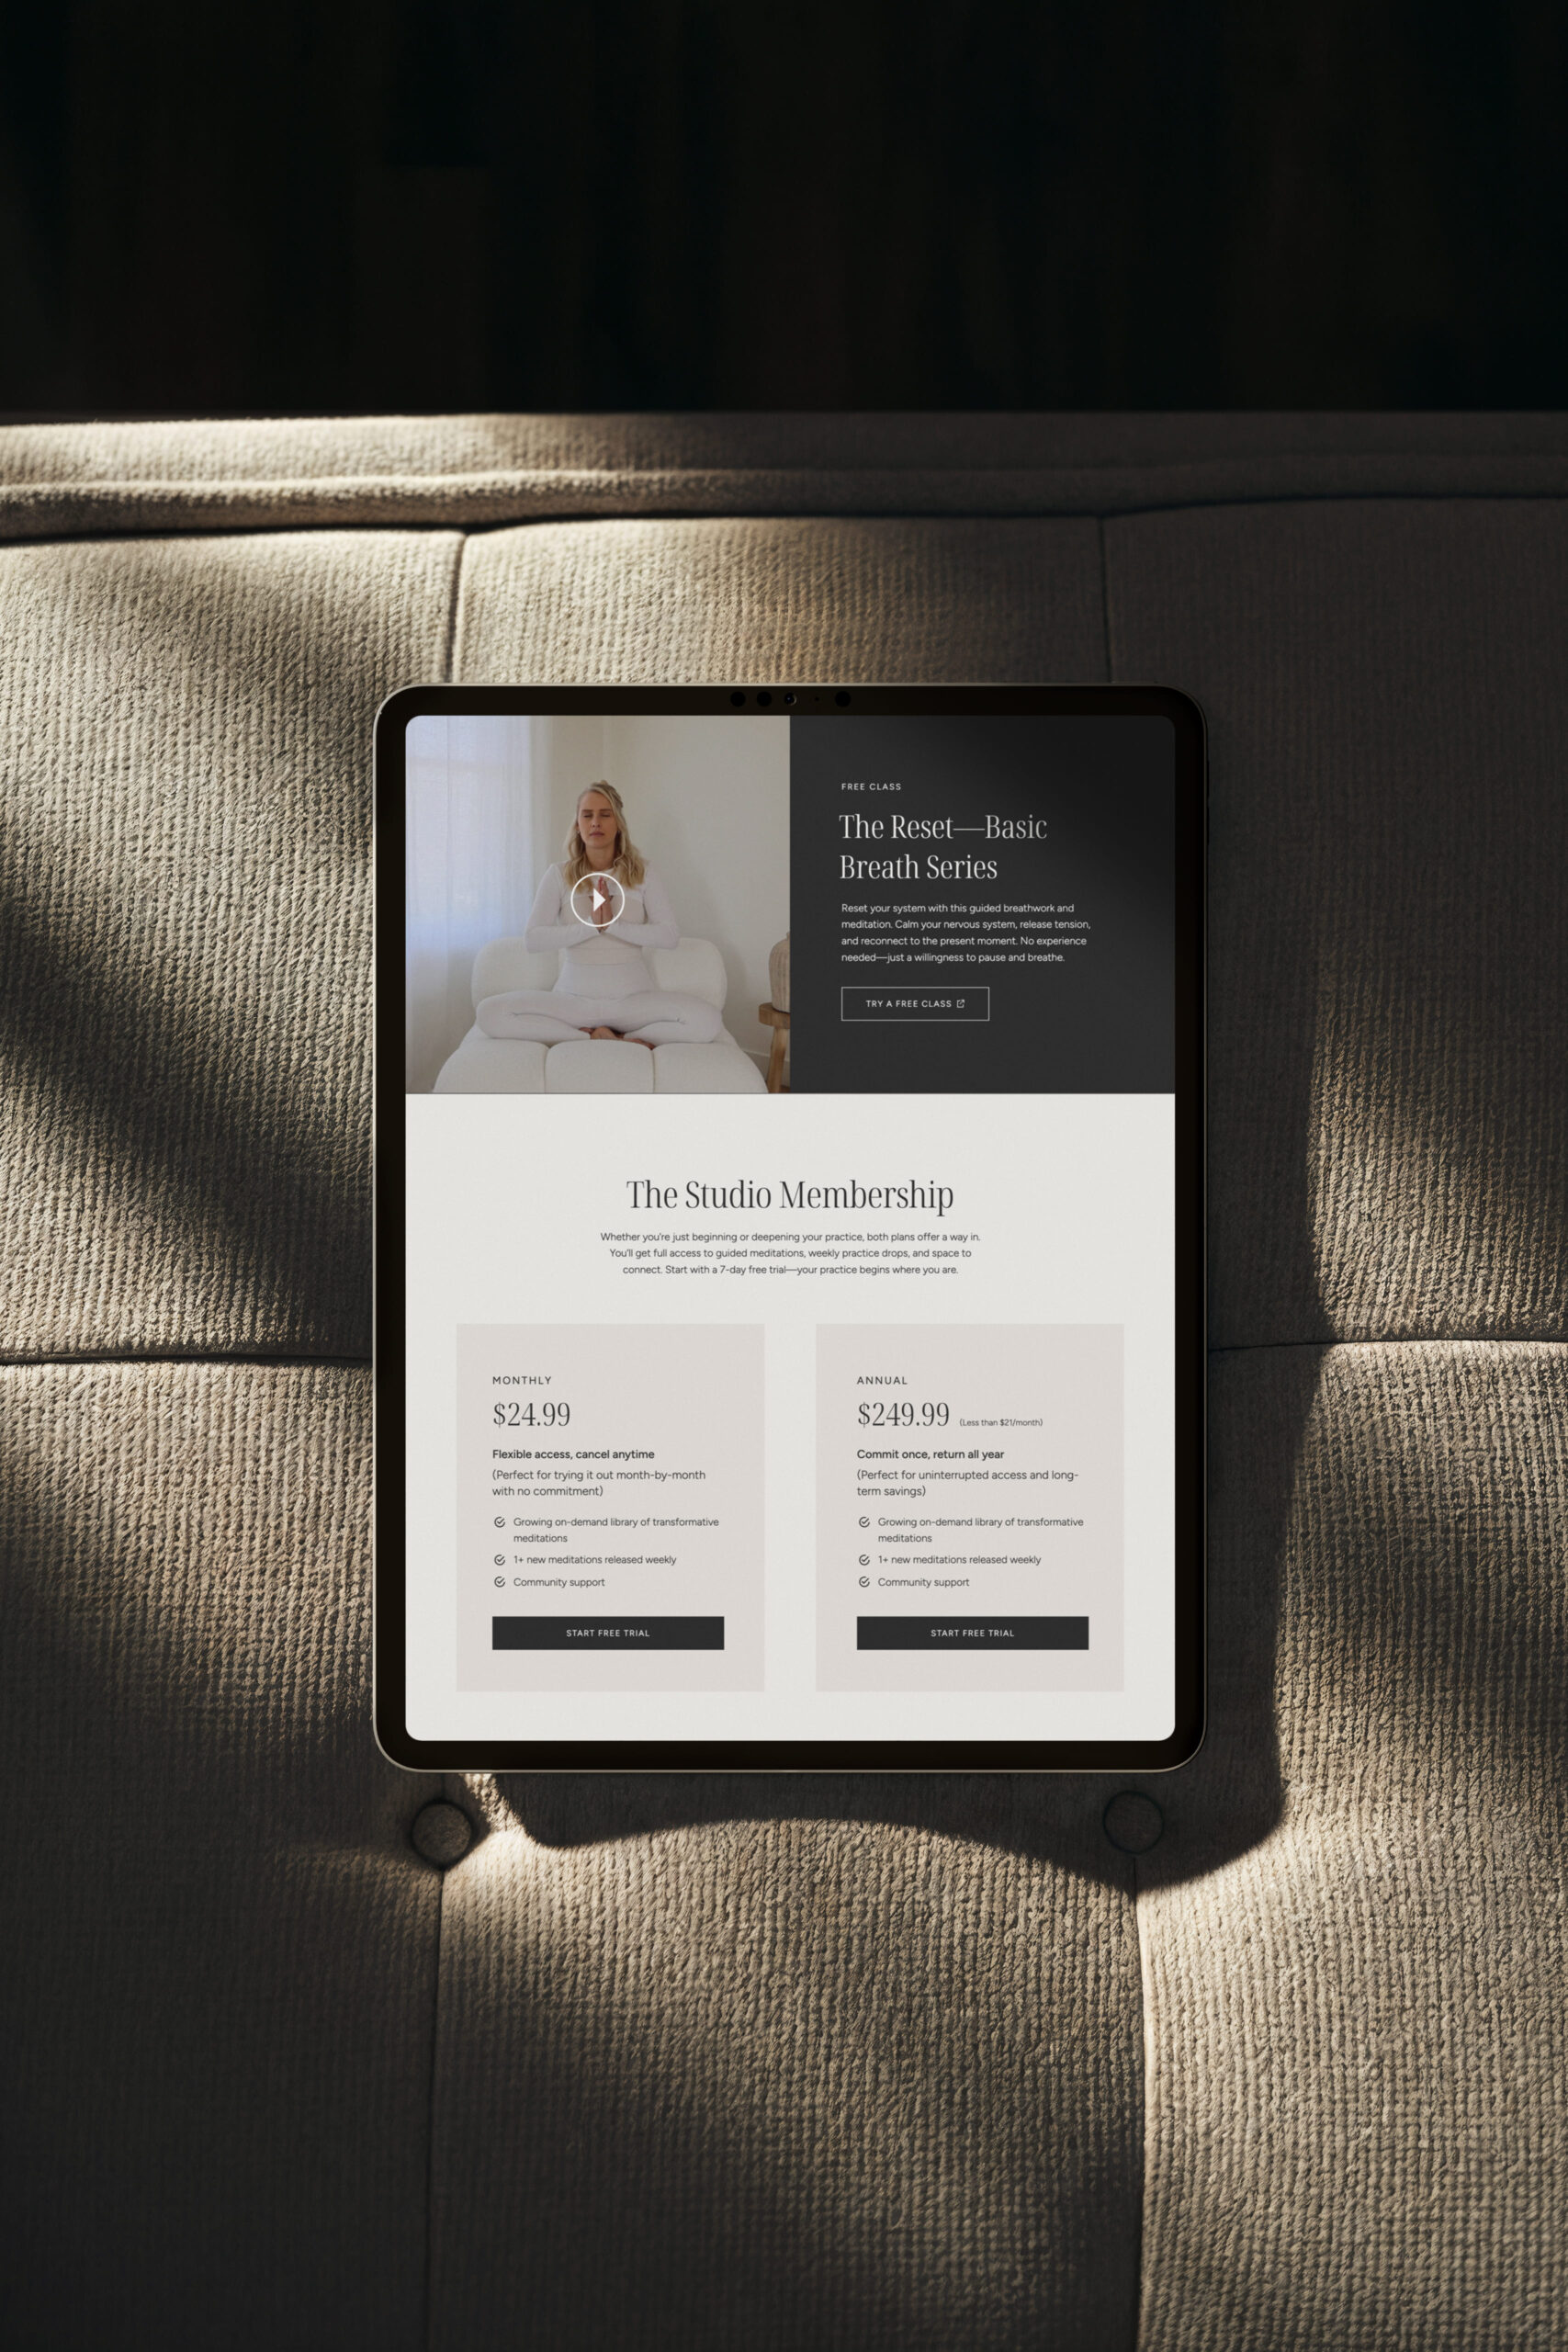
Step 1: Design your shop pages in Showit
First, start with designing everything in Showit. At minimum, you’ll need 2 main parts:
- A main Shop page → this is your “storefront” that lists all your products
- Individual product pages → one page for each item you’re selling, where people can learn more and click to buy
That’s pretty much it! You can always add more pages (like “FAQs” or “Shipping & Returns”) but this simple setup works beautifully for online shops.
How to design your Shop page
Start with one clean, simple layout.
- Add a short headline that welcomes people in (ex: “Shop the collection” or “Digital products for everyday wellness”)
- Create a neat grid with product images, short titles, and prices
- Link each image or title to the product’s own page
Keep your images consistent and well-lit – this makes your shop feel professional even with just a few products.
If design isn’t your thing, this is where working with a designer can save you hours and headaches. I can handle all of this for you so you can stay focused on creating your next dreamy offer. ✨
How to design your Product pages
Each product should have its own dedicated page so people can see the details and confidently make a purchase.
Here’s a simple layout that works:
- A large photo of your product or course cover
- A short description explaining what it is and who it’s for
- A clear price
- One main “Buy Now” button
Within this, you can also include sections for things like:
- What’s included or what they’ll learn
- Ingredients or materials (if applicable)
- Shipping or access info
- Refund policy or disclaimers
Once you’ve made one product page, all you have to do is duplicate it for each new item and just swap out the image(s), text, and button link.
Step 2: Choose your checkout system
This is what makes your shop functional.
Your checkout system is where you’ll set up products, handle payments, and manage customer orders.
Here are some of the best options for Showit sites:
Shopify Starter
Shopify Starter is pretty affordable and beginner-friendly. You’ll need to set up an account and create your products in Shopify, then it will automatically generate a tiny piece of code called a Buy Button that you just paste into your Showit pages.
🟢 Pros:
- Affordable monthly plan
- Customers can add multiple items to their cart
- Reliable, trusted checkout system
- Works with both physical and digital products
🟡 Cons:
- Checkout opens in a new tab, so the shopping flow takes visitors off your main site
- Styling options are limited
- Requires a bit of setup time to link everything properly
ThriveCart
ThriveCart is a fave among the Showit community. It’s a one-time payment that gives you lifetime access (no monthly fees!) and offers powerful features like payment plans, upsells, and affiliate programs – perfect for selling digital products or courses. I don’t know if they’re ever going to change this pricing model in the future, so definitely check it out while it’s here!
Similarly to Shopify Starter, you add in all your products to ThriveCart and then it shares a little code that you paste into Showit.
🟢 Pros:
- One-time payment for lifetime access
- Payment plans, upsells and affiliate tools are built in
- Fully customizable checkout pages
- Integrates with Stripe, PayPal, and more
🟡 Cons:
- Customers can only add one main product per checkout (though you can add upsells or add-ons directly on the checkout page)
- Not ideal for stores selling many small items or physical inventory (may need to use a third-party tool for shipping)
- Slight learning curve when setting up your first product
WooCommerce
WooCommerce is a popular e-commerce plugin that runs inside WordPress. Since Showit blogs run on WordPress, it’s a great fit if you’re already on Showit’s Advanced Blog plan. It takes a bit more tech setup but gives you lots of control over how your shop looks and functions.
🟢 Pros:
- Fully customizable
- Supports both physical and digital products
- No monthly free (unless using paid extensions)
- Great long-term option if you want more control
🟡 Cons:
- Requires advanced setup (not beginner-friendly)
- You’ll need to be on Showit’s highest plan
- Showit doesn’t officially support WooCommerce, so you’ll be managing it independently
- Best handled by an experienced designer or developer
Flodesk Checkout
If you already use Flodesk for email, this one’s an easy win. (If not, I definitely recommend checking it out and getting 50% off your first year.) It’s easy to use, clean, minimal, and perfect for selling simple offers like workshops, PDFs, or memberships.
🟢 Pros:
- Simple, beautiful checkout pages
- Seamlessly integrates with Flodesk emails
- Allows subscriptions and memberships
🟡 Cons:
- Limited design customization
- No shopping cart (one item per checkout)
- Less flexible for larger product catalogs
Kajabi or Teachable (for courses)
If your product is an online course or membership, you don’t need to overcomplicate it. You can design your course sales page in Showit, then link your “Buy Now” button to your Kajabi or Teachable (or other course platform) checkout page.
🟢 Pros:
- All-in-one setup (hosting, checkout, delivery)
- Professional experience for your students
- Easy to manage if your main offer is educational
🟡 Cons:
- Less customizable checkout pages
- No integrated cart for multiple products
- Platform fees can add up for higher plans
Step 3: Connect it all together
This is the part where your beautiful design and your cart system come together.
Here’s what to do:
- Create your products in your checkout platform
- Generate your Buy Button or checkout link (each platform gives you one)
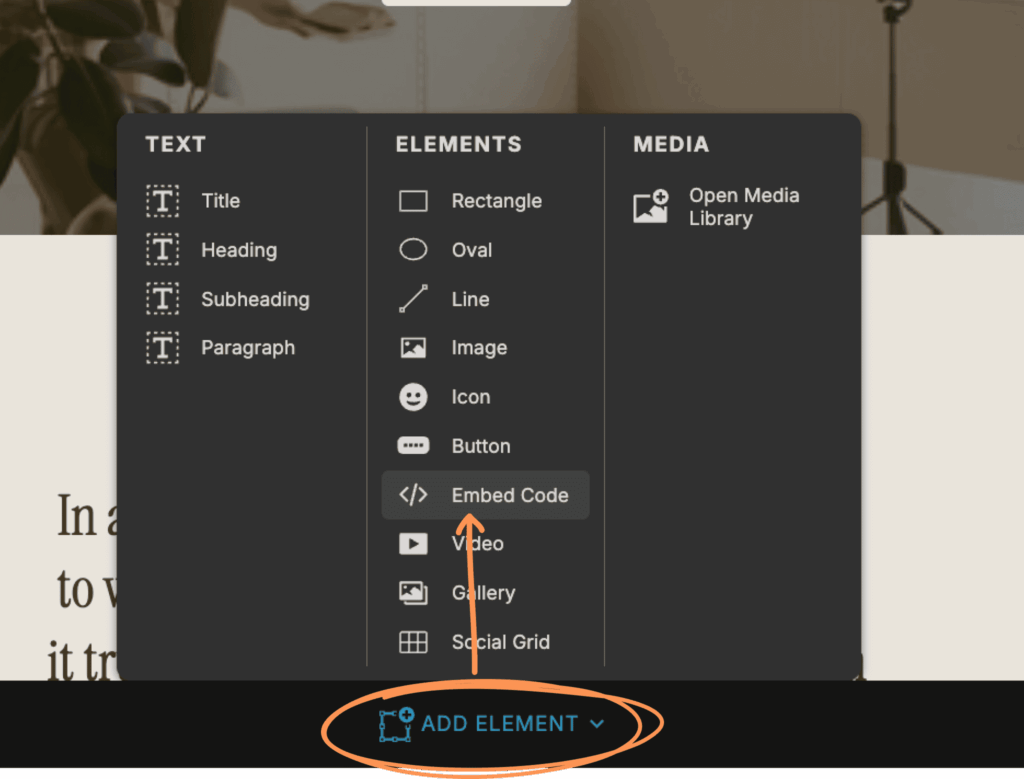
- Embed that code or link into your Showit product page, right where your Buy Now button should be (In the Showit builder, click Add Element at the bottom of the page > Embed Code > paste your code, then resize and position the embed box to match your button.)
- Test everything. Click the button, go through checkout, and make sure payments and emails work.
Once that’s done, you have a working shop!
Step 4: Link your shop across your site
Don’t forget this step! Now you have to make your shop easy to find.
- Add a “Shop” link to your main menu and footer
- Mention your products on your homepage and in your blog posts
- Add small shop banners throughout relevant pages (for example, under your freebie or services)
Step 5: Do a final test before launch
Before you announce your new shop, double-check:
✅ All product buttons go to the right page
✅ Checkout opens and completes smoothly
✅ Prices and taxes are correct
✅ Confirmation emails look on brand
✅ Mobile experience feels simple and easy
I always recommend doing a test purchase yourself so you can see exactly what customers experience from start to finish. The last thing you want is to have any hiccups that will turn your buyers away.
Bonus: The hybrid setup
Some businesses use a hybrid approach – keeping their main site on Showit (for its design freedom) and running a full Shopify store separate at shop.yourdomain.com.
This setup gives you the best of both worlds:
- A beautifully branded website on Showit
- A fully equipped e-commerce system on Shopify for inventory, shipping, and analytics.
It does mean managing 2 systems, but it’s a smart next step if your product line grows over time.
The bottom line
Adding an online shop to your Showit website is much easier than it seems and totally doable, even if you’ve never sold online before.
Start with your design, choose the checkout tool that fits your goals, connect the two, and test your flow.
But If you’d rather skip all this and launch your site without any of the setup headaches, I’d love to help! I’ll design your shop pages, connect your checkout system, and make sure everything looks beautiful and works seamlessly.
👉 Explore my Showit design services here.
—
Note: Some links on this page are affiliate links, so I may earn a small commission if you purchase through them (at no extra cost to you). Sometimes, you’ll get a discount or special bonus for using them.

Vickie is the founder of VERVE & COLOR, a creative studio crafting elevated, intentional websites for health and wellness brands. She’s spent over a decade studying and practicing wellness—from holistic nutrition and meditation to sound therapy and somatic healing—alongside a career designing digital experiences for global companies. Today, she blends both worlds to create websites that are not only beautiful and easy to use, but rooted in the heart of the work her clients do.
